
Building a roof for your dog’s house might seem tricky, but it doesn’t have to be. You want your furry friend to stay dry, cozy, and safe no matter the weather.
The right roof can make all the difference. In this guide, you’ll discover simple steps to create a sturdy, weatherproof roof that fits your dog’s needs perfectly. Keep reading, and you’ll have a comfortable shelter ready in no time—your dog will thank you!

Credit: medium.com
Choosing The Right Roof Style
Choosing the right roof style for your dog house affects comfort and durability. The roof protects your dog from rain, sun, and cold. It also adds to the house’s overall look. Different roof styles offer unique benefits. Consider your climate, space, and materials before deciding.
Flat Roof Benefits
- Simple to build with fewer materials.
- Good for small dog houses or limited space.
- Easier to clean and maintain.
- Can double as a platform or storage area.
Sloped Roof Advantages
- Allows rain and snow to slide off easily.
- Improves water drainage and prevents leaks.
- Provides better ventilation inside the dog house.
- Offers a classic look that suits many styles.
Gable Roof Features
- Two sloping sides that meet at a ridge.
- Excellent for shedding rain and snow quickly.
- Creates extra headroom and space inside.
- Strong and durable against harsh weather.
Credit: www.familyhandyman.com
Selecting Durable Materials
Selecting the right materials for your dog house roof is key to its strength and comfort. The roof must protect your dog from rain, sun, and cold. Choose materials that last long and resist weather damage.
Think about materials that are sturdy and safe. The roof should also keep water out and hold warmth inside. This will keep your dog dry and cozy in all seasons.
Wood Options
Wood is a popular choice for dog house roofs. It is easy to work with and looks natural. Cedar wood resists rot and bugs well. Pine is cheaper but needs treatment to last longer.
Choose smooth wood to avoid splinters. Use thick planks for strength. Make sure the wood fits tightly to stop water from leaking.
Waterproofing Materials
Waterproofing protects the roof from rain and snow. Roofing felt is a simple, effective layer to keep water out. Asphalt shingles offer strong waterproof protection and last many years.
Rubber membranes create a flexible, watertight surface. Paints and sealants add extra protection to wood. Always cover the roof edges well to prevent leaks.
Insulation Choices
Insulation helps keep the dog house warm in winter and cool in summer. Foam boards are light and easy to cut. Reflective foil insulation blocks heat from the sun.
Fiberglass insulation works but can be tricky to handle safely. Use materials that stay dry and do not mold. Proper insulation makes the dog’s space comfortable all year.
Measuring And Cutting
Measuring and cutting the materials for your dog house roof is a crucial step that sets the foundation for a sturdy and well-fitting shelter. Precision in this phase ensures that the roof fits snugly, protecting your dog from rain, sun, and cold winds. Let’s dive into how you can make these tasks straightforward and safe.
Accurate Measurements
Start by measuring the dimensions of the dog house opening and the frame where the roof will rest. Use a tape measure and note down the length and width carefully. Remember to add a little extra length to the measurements for overhang—this helps keep water away from the walls.
Mark your measurements clearly on the roofing material with a pencil or chalk. Double-check your numbers before cutting. It’s easy to get excited and rush, but taking your time here saves you from having to redo the roof later.
Safe Cutting Techniques
Choose the right tool for cutting based on the material: a handsaw works well for plywood, while a utility knife might be better for roofing felt. Always wear safety goggles and gloves to protect yourself from splinters and sharp edges. A clean, steady cut will make installation easier and improve the overall look of the roof.
Secure the material on a stable surface before cutting to prevent slips. If you’re using power tools, keep your fingers clear and work slowly. Have you ever noticed how a small slip can turn a project into a frustrating mess? Taking safety seriously keeps your dog’s new home safe too.
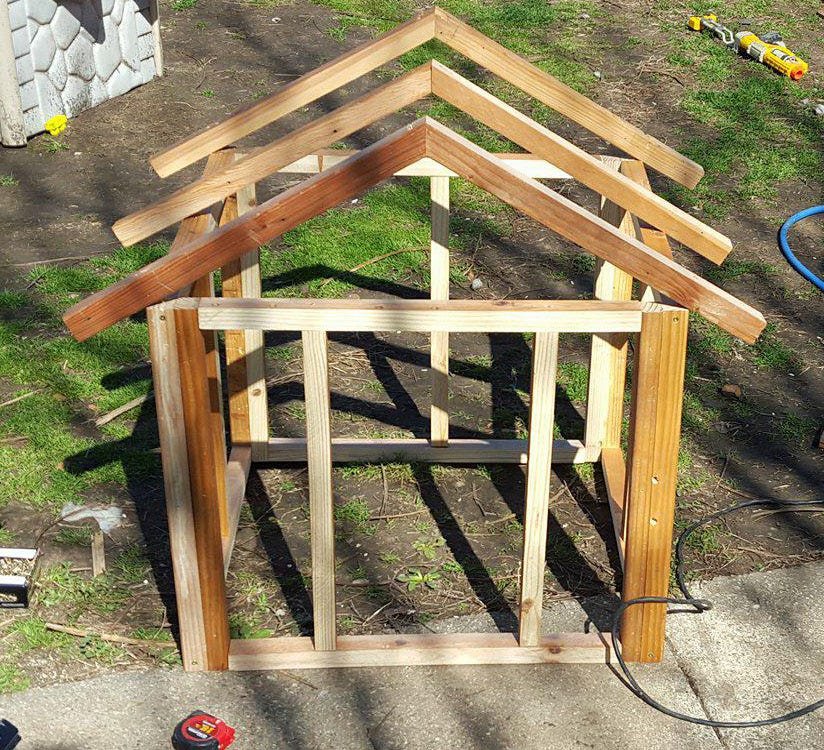
Assembling The Roof Frame
Assembling the roof frame is a crucial part of building a sturdy and weatherproof dog house. It provides the shape and support needed to hold roofing materials and protect your furry friend from the elements. Taking time to build a solid frame will pay off in durability and comfort for your dog.
Building The Base
The base of the roof frame acts as the foundation for everything else. Start by measuring the dimensions of your dog house to cut the wood pieces accurately.
- Use 1x3 or 1x4 lumber for a lightweight yet strong base.
- Cut two long pieces to match the length of the dog house.
- Cut two shorter pieces to fit the width, forming a rectangle.
Connect these pieces using wood screws or nails, ensuring the corners are square. You can check squareness by measuring diagonals; if they match, your frame is properly aligned.
Securing Support Beams
Support beams add strength and shape to the roof. Position them evenly across the base to hold the roofing panels securely.
- Cut several beams the same length as the width of the base.
- Place them perpendicular to the base frame and space them about 6-8 inches apart.
- Attach each beam firmly with screws or nails, driving fasteners at both ends.
Think about the weight your dog house roof will bear, especially if you live in a snowy area. Would extra beams give you better peace of mind? Adding a small overhang on each side can also protect the walls from rain runoff.
Adding Waterproof Layers
Adding waterproof layers to a dog house roof keeps your pet dry and safe. Water can damage the wood and make the interior uncomfortable. A solid waterproof layer stops leaks and protects against rain and snow. It also extends the life of the dog house. Follow these simple steps to create a sturdy, water-resistant roof for your dog’s shelter.
Installing Roofing Felt
Roofing felt is a thin, protective sheet that blocks water from seeping through. Cut the felt to match the size of the roof panels. Roll it out smoothly over the wood surface. Use roofing nails or staples to secure the felt, placing them every few inches.
Make sure the felt overlaps at the edges by about two inches. This overlap prevents water from entering gaps. Start at the bottom edge and work your way up. This way, rainwater will flow over the layers and not underneath.
Applying Sealant
Sealant adds an extra layer of protection on top of the roofing felt. Choose a waterproof sealant made for outdoor use. Apply the sealant evenly over the felt using a brush or roller. Pay special attention to corners and edges.
Seal any gaps or cracks to stop water from entering. Allow the sealant to dry fully before exposing the roof to rain. This step ensures the dog house stays dry and comfortable all year round.
Attaching Roofing Material
Attaching roofing material is a crucial step in building a durable dog house roof. The right attachment method ensures your roof stays secure in all weather conditions, protecting your furry friend. Whether you choose shingles or metal sheets, proper installation matters for longevity and safety.
Nailing Shingles
Nailing shingles is a popular choice for a dog house roof because it offers excellent protection and a neat finish. Start by laying down roofing felt or tar paper to create a waterproof barrier. This step keeps moisture from seeping into the wood below.
Use roofing nails with large heads to secure each shingle firmly. Space the nails evenly—usually two nails per shingle—near the top edge to prevent wind from lifting them. Don’t hammer nails too deep; they should hold the shingles snugly without damaging them.
Overlap each row of shingles by about half to ensure water runs off properly. If you’ve ever struggled with loose shingles on your own roof, you know how important tight nailing is. It keeps everything in place during strong winds and heavy rain.
Fixing Metal Sheets
Metal sheets offer a lightweight and durable roofing option that’s easy to clean. Before attaching, make sure the roof frame is solid and straight to avoid bending the metal. Place the metal panels so they overlap to prevent leaks.
Secure the sheets with screws fitted with rubber washers to create a watertight seal. Use a drill to drive the screws into the roof frame, spacing them about every 6 to 8 inches along the edges and every 12 inches in the center. This method prevents the metal from loosening over time.
One tip I learned from experience: avoid over-tightening screws to prevent denting the metal. Have you ever noticed your dog’s comfort changes with a noisy roof? Metal can be louder, so consider adding insulation underneath for a quieter space.
Insulating For Comfort
Insulating your dog house roof is key to keeping your furry friend comfortable, no matter the weather. Proper insulation helps maintain a steady temperature inside, protecting your dog from cold drafts in winter and excessive heat in summer. It’s a simple step that makes a big difference in your pet’s well-being.
Choosing Insulation Types
Choosing the right insulation depends on your climate and budget. Common options include foam boards, reflective foil, and fiberglass. Foam boards are easy to cut and install, and they provide excellent thermal resistance.
Reflective foil works best in hot climates as it reflects heat away. Fiberglass is effective but can be messy and should be handled carefully to avoid irritation. Think about your dog’s specific needs: do they need more warmth or cooling?
Installing Insulation Properly
Proper installation ensures the insulation does its job well. Start by measuring the roof area accurately, then cut the insulation material to fit snugly without gaps. Gaps can let cold air in or warm air out, reducing effectiveness.
Secure the insulation with staples or adhesive, depending on the material. Cover the insulation with a waterproof layer like plywood or thin plastic to protect it from moisture. Have you checked that there’s enough ventilation? A well-insulated roof still needs airflow to avoid dampness.
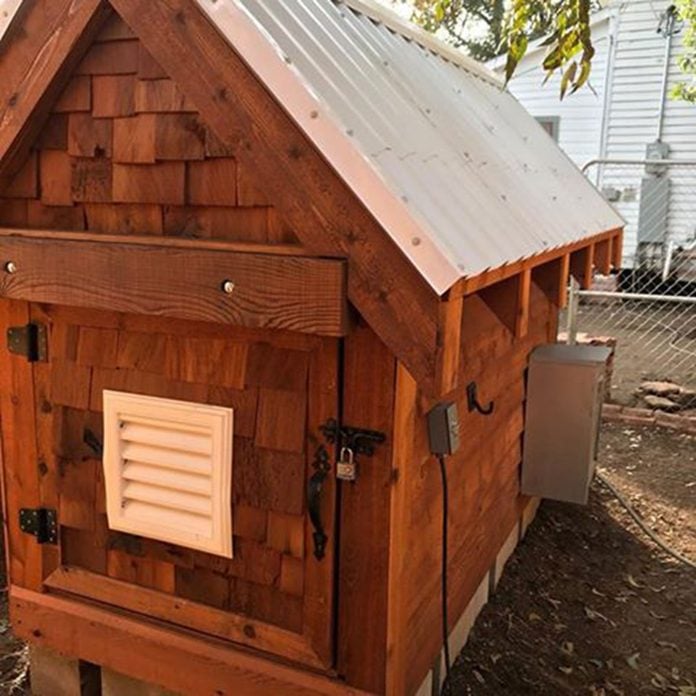
Finishing Touches
Finishing touches give your dog house roof a polished, durable look. These final steps protect the roof from weather and keep your pet comfortable. Small details make a big difference in the roof’s lifespan and function. Focus on painting, sealing, and ventilation for the best results.
Painting And Sealing
Use paint made for outdoor wood to protect the roof. It keeps moisture out and prevents wood from rotting. Choose non-toxic paint to keep your dog safe. Apply at least two coats for full coverage. Let each coat dry before adding the next.
After painting, apply a clear sealant. This layer adds extra protection from rain and sun. Sealants also help prevent cracks and peeling. Make sure the sealant is pet-friendly and safe for outdoor use. Cover all edges and corners thoroughly.
Adding Ventilation
Ventilation keeps air flowing inside the dog house. It stops heat buildup and reduces moisture. Good airflow keeps your dog cool and healthy.
Drill small holes near the roof edges. Space them evenly to allow air in and out. Cover holes with mesh to keep bugs away. Another option is to add small vents under the roof overhang.
Check ventilation often to make sure it stays clear. Blocked vents can cause heat and mold problems. Proper airflow makes the dog house a comfortable place year-round.
Maintenance Tips
Keeping your dog house roof in good shape is important for your pet’s comfort. A well-maintained roof protects against rain, sun, and wind. Simple care steps help extend the roof’s life and keep your dog safe.
Regular Inspections
Check the roof often for damage or wear. Look for cracks, loose shingles, or holes. Early spotting of problems stops bigger damage. Inspect after storms or strong winds. Note any changes and plan quick fixes.
Cleaning And Repairs
Remove leaves, dirt, and debris from the roof surface. Clean gutters or edges to prevent water buildup. Use mild soap and water for cleaning. Fix small cracks or holes with waterproof sealant. Replace broken shingles or panels right away.

Credit: dallasfwlocksmith.com
Frequently Asked Questions
What Materials Are Best For A Dog House Roof?
Wood, asphalt shingles, and corrugated metal are great roofing materials. They provide durability, weather resistance, and insulation for your dog’s comfort. Choose based on climate and budget to ensure long-lasting protection.
How Do I Waterproof A Dog House Roof?
Apply roofing felt or waterproof membrane before adding shingles. Use sealant on edges and joints to prevent leaks. Proper waterproofing keeps your dog dry during rain and snow.
What Roof Style Is Best For A Dog House?
A slanted or A-frame roof works best. It allows water and snow to easily slide off. This design ensures good ventilation and prevents water damage inside the dog house.
How To Insulate A Dog House Roof Effectively?
Use foam board or reflective insulation under the roof. This keeps the dog house warm in winter and cool in summer. Proper insulation improves your pet’s comfort year-round.
Conclusion
Building a dog house roof is simple and rewarding. You ensure your pet stays dry and comfortable. Start with sturdy materials. Measure carefully. Follow each step closely. Secure the roof firmly. Your dog will thank you with happy wags. Remember, a well-built roof lasts longer.
Keep your tools handy. Check the roof regularly for any wear. A little effort goes a long way. Enjoy your DIY project. Your dog’s home should be cozy and safe. Happy building!