
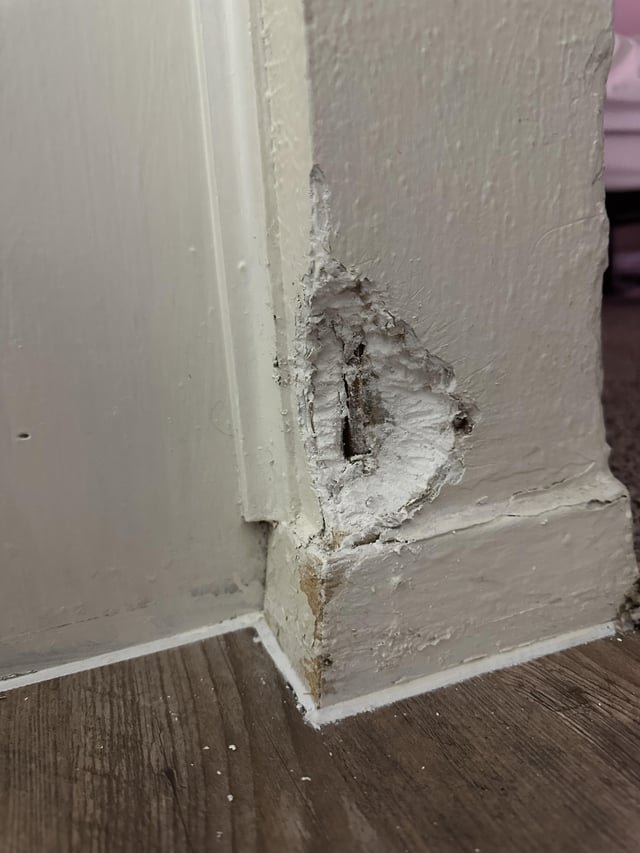
Has your furry friend mistaken the corner of your wall for a chew toy? You're not alone.
Many pet owners face this common problem and wonder how to restore their home to its former glory. The sight of chewed walls can be frustrating, especially when you’ve invested time and money into creating a beautiful space. But don't worry, fixing it is easier than you think.
By following a few simple steps, you can make your wall look as good as new. Stick with me, and you'll learn how to tackle this problem effectively, ensuring your home remains a cozy, inviting place for both you and your pet. Ready to transform that chewed corner back to perfection? Let's dive in.
Assessing The Damage
Assessing the damage is the first step to fixing a wall corner chewed by your dog. Careful inspection helps you understand how deep and wide the damage is. This knowledge guides the repair process and ensures lasting results.
Identifying Chewed Areas
Look closely at the corner of the wall. Notice any rough or uneven spots. Chewed areas often have chipped paint and exposed drywall or plaster. Check for small holes, scratches, or missing chunks. Use a flashlight for better visibility in corners. Mark these spots with a pencil for easy reference.
Checking Wall Material
Know what type of wall you have before fixing it. Common wall materials include drywall, plaster, or wood paneling. Tap gently on the damaged area to feel the surface. Drywall feels soft and crumbly. Plaster is harder and may crack differently. Wood paneling may have splinters or gouges. Identifying the material helps you pick the right repair tools and products.

Credit: www.reddit.com
Gathering Repair Materials
Gathering the right materials is the first step to fixing a dog-chewed corner. Having everything ready saves time and makes the repair process smoother. It ensures you can complete the job without interruptions.
Choosing the right tools and repair products affects the final look and durability. Use materials designed for wall repairs to get the best results. Below are important tools and products to prepare before starting.
Essential Tools
- Putty knife for applying filler smoothly
- Sandpaper (medium and fine grit) to smooth rough edges
- Utility knife to trim loose or damaged drywall
- Paintbrush or roller for painting after repair
- Measuring tape to check the damaged area size
- Protective gloves to keep hands clean
- Drop cloth to protect the floor from dust and paint
Recommended Repair Products
- Spackling paste or joint compound for filling holes and dents
- Drywall patch for larger holes or torn drywall corners
- Primer to seal repaired areas before painting
- Matching wall paint for a seamless finish
- Painter’s tape to protect edges during painting
Preparing The Wall
Preparing the wall is the first key to fixing the corner chewed by your dog. Proper preparation ensures the repair material sticks well and looks smooth. Take time to get this step right for a lasting fix.
Cleaning The Damaged Spot
Start by wiping the area with a damp cloth. Remove dirt, dust, and any pet hair from the surface. Clean walls help repair compounds adhere better. Let the spot dry fully before moving on.
Removing Loose Debris
Check for loose pieces of paint or drywall around the damage. Gently scrape off any flakes using a putty knife or scraper. Clear debris prevents bumps and uneven patches later. A clean, solid edge makes the repair neat and strong.

Credit: www.reddit.com
Filling And Patching
Fixing a dog-chewed corner means restoring both the look and strength of your wall. Filling and patching help you rebuild the damaged area, making it ready for painting or further treatment. It’s a hands-on process that anyone can do with the right materials and a bit of patience.
Applying Spackle Or Wood Filler
Choose a filler based on your wall’s material—spackle for drywall, wood filler for wooden corners. Use a putty knife to press the filler firmly into the chewed spots, making sure to cover all gaps and holes. Don’t rush; applying in thin layers helps prevent cracking later.
Have you noticed how some fillers dry faster than others? Pick one that matches your schedule but allows enough working time to smooth it out properly. If the damage is deep, apply multiple layers, letting each dry fully before adding the next.
Sanding For Smoothness
Once the filler is dry, sanding shapes the patch to match your wall’s surface. Use fine-grit sandpaper and move in small, circular motions to blend the edges seamlessly. Be gentle to avoid removing too much filler and exposing the damaged area again.
Think about how a smooth finish affects paint adhesion. Rough patches will show through even the best paint jobs. Taking your time here ensures your repair stays invisible and durable.
Reinforcing The Corner
Reinforcing the corner is essential to prevent your dog from chewing the same spot again. Strengthening the area not only fixes the damage but also protects your walls from future wear and tear. Let’s look at practical ways to make the corner durable and chew-resistant.
Using Corner Beads
Corner beads are strips of metal or plastic designed to cover and protect wall edges. They add a hard layer that resists chewing and accidental bumps. You can find corner beads at most hardware stores, and they come in different materials depending on your preference and wall type.
Installing corner beads is straightforward. First, cut the bead to fit the height of your wall. Then, press it firmly against the corner so it aligns perfectly with the edges.
Have you noticed how some corners stay pristine despite heavy use? Corner beads are often the reason. They create a shield that saves you from constant repairs.
Securing With Adhesive Or Nails
Once you position the corner bead, secure it using either adhesive or nails. A strong construction adhesive works well if you want a clean look without nail holes. Apply the adhesive evenly along the back of the bead, then press it firmly into place and allow it to dry.
If you prefer nails, use small finishing nails along the bead’s length. This method offers extra strength and keeps the bead firmly attached even if your dog tries to chew. Remember to countersink the nails slightly and fill the holes with spackle for a smooth finish.
Which securing method fits your tools and skill level better? Adhesive offers simplicity, while nails provide long-lasting hold. Choose what suits your project and comfort.
Painting And Finishing
Painting and finishing are key to restoring your wall’s appearance after repair. A smooth, even paint job hides imperfections and blends the patch with the rest of the wall. Proper painting also protects the repaired area from damage and wear.
Priming The Repaired Area
Start by applying a primer to the fixed corner. Primer seals the surface and helps paint stick better. Use a brush or roller to cover the entire repaired patch evenly. Let the primer dry completely before moving on. This step prevents uneven color and texture later.
Matching Wall Paint
Choose paint that matches your wall’s original color. Take a small chip of your wall paint to a store if unsure. Many stores offer color matching services for accuracy. Use the same paint finish—matte, satin, or gloss—to keep the look consistent. Testing a small area first avoids color surprises.
Applying Final Coats
Apply the paint in thin, even layers. Use a brush for corners and a roller for larger areas. Let each coat dry fully before adding another. Usually, two coats give the best coverage. Lightly sanding between coats can smooth the surface. Finish with a clean brush stroke for a professional look.
Preventing Future Damage
Preventing future damage to wall corners chewed by your dog needs focus and care. Fixing the wall is only the start. Stopping your dog from chewing again saves time and money. It also keeps your home looking nice. Use training, deterrents, and protection to guard your walls.
Training Your Dog
Teach your dog what is okay to chew. Give them toys to bite instead of walls. Use clear commands like "no" or "leave it" when they start chewing walls. Praise them when they chew their toys. Consistency helps dogs learn fast. Spend time each day training and rewarding good behavior.
Using Deterrents
Apply safe sprays that taste bad to dogs on wall corners. These sprays stop dogs from biting those spots. Choose sprays made for pets to avoid harm. Reapply the spray often, especially after cleaning. The bad taste makes dogs avoid the walls. This method works well with training.
Protecting Wall Corners
Cover corners with guards made of plastic or metal. These guards stop dogs from reaching the wall surface. Use corner protectors made for homes with pets. You can also place furniture to block access. Another idea is using thick tape or fabric temporarily. Protecting corners helps keep walls safe while training works.

Credit: www.reddit.com
Frequently Asked Questions
How Do I Repair A Dog-chewed Corner Wall?
First, clean the damaged area by removing loose debris. Then, apply spackle or wood filler to fill gaps. Sand it smooth once dry. Finally, repaint to match the wall color for a seamless finish.
What Materials Are Needed To Fix Chewed Wall Corners?
You will need spackle or wood filler, sandpaper, a putty knife, primer, and paint. Optionally, use painter’s tape to protect surrounding areas. These materials help restore the wall’s surface effectively and prevent further damage.
Can I Prevent My Dog From Chewing Walls Again?
Yes, provide chew toys and keep your dog mentally stimulated. Use deterrent sprays on walls and train your dog with positive reinforcement. Consistent supervision helps reduce destructive chewing behavior.
How Long Does It Take To Fix A Dog-chewed Wall Corner?
Repairs typically take a few hours to complete. Drying time for filler and paint may require 24 hours. Plan for multiple steps including cleaning, filling, sanding, and painting for best results.
Conclusion
Fixing a dog-chewed wall corner is simple with the right steps. Clean the damaged area well first. Use filler or putty to cover holes and cracks. Sand the surface smooth after it dries. Paint the corner to match your wall color.
This repair will make your wall look like new. Taking care of damage quickly keeps your home neat. Small fixes save money and avoid bigger problems later. Your dog’s chewing won’t stay a problem for long.