
Does your furry friend struggle to jump onto the bed? Watching your dog hesitate or strain can be heartbreaking.
You want to keep your pet comfortable and safe, but buying a ramp can be expensive or not fit your space. What if you could build a dog ramp for your bed yourself, tailored perfectly to your needs? In this guide, you’ll discover simple steps to create a sturdy, safe ramp that helps your dog climb up with ease.
Keep reading to learn how to make your dog’s life easier—and your bond even stronger.
Choosing The Right Ramp Design
Choosing the right ramp design for your dog’s bed is crucial to ensure safety, comfort, and ease of use. The design affects how easily your dog can climb up and down and how well the ramp fits with your bed and room layout. Think about your dog’s size, mobility, and preferences before deciding on a design.
Types Of Dog Ramps
There are several ramp styles you can consider, each with its own benefits:
- Straight ramps:Simple and easy to build, these ramps run directly from the floor to the bed. They work well for lower beds and dogs comfortable with a steady incline.
- Foldable ramps:Great if you need to store the ramp when not in use. Folding sections allow for easy transport and space-saving.
- Curved or angled ramps:These ramps reduce the incline by extending the length and adding turns. They are helpful for dogs with joint issues or difficulty climbing steep slopes.
Which type will match your dog’s needs and your space best?
Considerations For Bed Height
The height of your bed directly impacts ramp length and slope. A steep ramp can strain your dog’s joints or discourage use. Measure your bed’s height from the floor to the mattress surface to find the correct ramp length.
Generally, a slope between 18 to 25 degrees is safest and most comfortable. If your bed is very high, a longer ramp or one with an angled design is better. Can your dog manage a gentle incline, or do they need a more gradual slope?
Selecting Suitable Materials
Material choice affects durability, traction, and appearance. Wood is a popular option because it’s sturdy and easy to customize with non-slip surfaces like rubber mats or textured paint. Aluminum ramps are lightweight and rust-resistant but may require added traction.
Consider materials that can withstand your dog’s nails and weight without damage. Avoid slippery surfaces that can cause falls. Have you checked what materials your dog responds well to underfoot?

Credit: www.vevor.ca
Gathering Tools And Supplies
Building a dog ramp for the bed needs proper preparation. Gathering the right tools and supplies saves time and effort. This step ensures a smooth building process and a safe ramp for your dog. Organize everything before starting to avoid interruptions.
Essential Tools
- Measuring tape for accurate dimensions
- Hand saw or power saw to cut wood
- Drill with drill bits for screws
- Screwdriver for assembling parts
- Sandpaper or electric sander to smooth edges
- Clamps to hold pieces while working
- Carpenter’s square to check right angles
Materials Checklist
- Wood boards for the ramp surface
- Wooden planks for the frame
- Non-slip surface material or grip tape
- Wood screws for strong joints
- Wood glue for extra hold
- Paint or sealant to protect wood
- Rubber feet to prevent sliding
Safety Gear
- Safety glasses to protect your eyes
- Work gloves to avoid splinters
- Ear protection if using loud tools
- Dust mask to prevent inhaling sawdust
Measuring And Planning
Building a dog ramp for your bed starts with careful measuring and planning. This stage ensures the ramp fits perfectly and is safe for your dog to use. Accurate measurements and a clear plan help avoid mistakes and wasted materials.
Determining Ramp Dimensions
Measure the height from the floor to the bed's top edge. This height is the ramp's rise. Consider your dog's size and mobility when deciding the ramp's width. A wider ramp offers better stability. Common widths range from 12 to 24 inches, depending on your dog's size.
Calculating Ramp Angle
The ramp angle affects how easy it is for your dog to climb. A gentle slope is best for older or smaller dogs. Aim for an angle between 18 and 25 degrees. To find this, use the formula: angle = arctan(rise/run). The run is the ramp's length along the floor. Keep the ramp length long enough to reduce steepness.
Sketching The Blueprint
Draw a simple blueprint of your ramp before building. Include all measurements: height, length, and width. Mark the ramp angle to visualize the slope. Add details like side rails or traction strips for safety. A clear sketch guides you through the building process and helps gather materials.
Building The Ramp Frame
Building the ramp frame is the foundation of a sturdy and safe dog ramp for your bed. The frame supports the entire structure, so accuracy and strength are key. Let’s break down the process into three manageable parts to help you create a reliable frame your dog will love.
Cutting Wood Pieces
Start by selecting strong, durable wood like pine or oak. Measure the height of your bed and decide on the ramp length to ensure a comfortable slope for your dog.
Cut two long side pieces to form the ramp’s length. Then, cut several shorter pieces that will serve as the cross supports between the sides.
Take your time with measurements and cuts. Have you noticed how a small mistake here can throw off the entire build? Precise cutting saves you from frustrating adjustments later.
Assembling The Frame
Lay the two long side pieces parallel on a flat surface. Position the shorter cross pieces evenly between them to create steps or supports for the ramp surface.
Spacing the cross supports correctly is crucial. Too far apart, and the ramp will wobble; too close, and it becomes heavier than necessary.
Use clamps to hold the pieces in place. This keeps everything steady as you prepare to secure the joints.
Securing Joints
Strong joints are non-negotiable for your dog’s safety. Use wood screws instead of nails for a more durable hold.
Pre-drill holes before screwing to prevent the wood from splitting. If you want extra stability, add wood glue at each joint before screwing.
After securing all joints, double-check for any loose parts. Would you trust a ramp that creaks or shifts under your dog’s weight? Neither will your furry friend.
Adding The Ramp Surface
Adding the ramp surface is a key step in building a safe and comfortable dog ramp for the bed. The surface must provide good traction to prevent slipping. It also needs to be securely attached to the ramp frame. Testing the ramp for stability ensures your dog can use it with confidence and ease.
Choosing Non-slip Materials
Select materials that offer strong grip for your dog’s paws. Options include rubber mats, carpet, or textured tapes. Rubber mats are durable and easy to clean. Carpet provides softness and extra grip but may wear over time. Textured tapes are affordable and simple to apply. Avoid smooth surfaces that can cause slipping and injuries.
Attaching The Surface
Secure the chosen material firmly to the ramp base. Use strong adhesive or screws suitable for the material underneath. Make sure the surface is flat and wrinkle-free to avoid tripping hazards. Trim edges carefully to prevent them from peeling or curling. Check that the surface covers the entire ramp length where your dog will walk.
Testing For Stability
Place the ramp on the bed and check for wobbling or shaking. Apply pressure by pressing down along the ramp. Walk your hand over the surface to confirm it stays firmly in place. Encourage your dog to try the ramp slowly. Watch for any signs of slipping or discomfort. Adjust the surface or supports if needed before regular use.

Credit: www.priorpet.com
Finishing Touches
Finishing touches make your dog ramp safe and attractive. These final steps improve durability and comfort. They also help your pet feel confident using the ramp. Focus on smooth surfaces, protection from wear, and a nice look.
Sanding And Smoothing
Start by sanding all surfaces of the ramp. Use medium-grit sandpaper to remove rough spots. Then switch to fine-grit for a smooth finish. Smooth edges prevent splinters and injuries. Check corners and joints carefully. Sand until the wood feels soft to touch.
Applying Protective Coating
Apply a protective coating to guard against moisture and damage. Choose a pet-safe sealant or paint. Water-based finishes work well and dry quickly. Use a brush to cover all areas evenly. Let the coating dry fully before use. This step extends the ramp’s life and keeps it clean.
Decorating The Ramp
Decorate the ramp to match your home or your dog’s personality. Use non-toxic paint or stickers that won’t peel off. Add a non-slip surface for safety, like rubber mats or carpet strips. Keep decorations simple and easy to clean. Personal touches make the ramp inviting for your dog.
Positioning The Ramp Safely
Positioning your dog ramp safely is crucial to ensure your pet can use it confidently without any risk of injury. A well-placed ramp offers your dog a smooth path to their bed, especially if they have mobility issues or are aging. Paying attention to how you secure and stabilize the ramp can make a big difference in your dog’s comfort and safety.
Securing Ramp To Bed
Make sure the top of the ramp is firmly attached to the bed frame or mattress base. Loose connections can cause the ramp to shift or slip, which might scare your dog or cause falls. Use strong brackets, straps, or non-slip pads designed for furniture to keep the ramp steady.
Think about the material of your bed frame—metal, wood, or fabric-covered—as this affects how you secure the ramp. If you’re unsure, test the attachment by applying weight on the ramp before letting your dog try it out.
Ensuring Stability
Stability is key. Place the ramp on a flat surface to prevent wobbling or tipping. If your floor is slippery, add rubber feet or a non-slip mat under the ramp base to keep it grounded.
Check the angle of the ramp; a slope too steep can be hard for your dog to climb, while too shallow might take up too much space. A good rule of thumb is a 20 to 30-degree incline. Have you measured your dog’s stride and height? That can help you find the perfect ramp length.
Training Your Dog To Use It
Introducing the ramp gently will help your dog accept it faster. Start by encouraging your dog to explore the ramp while it’s flat on the ground. Use treats and praise to create a positive association.
Once your dog feels comfortable, position the ramp at the bed and guide them up slowly. Patience matters—some dogs take time to trust new equipment. Have you noticed how your dog reacts to new objects? Use that to adjust your training pace.
Maintaining The Ramp
Maintaining your dog ramp is key to ensuring it stays safe and functional for your furry friend. A well-maintained ramp lasts longer and keeps your pet comfortable and confident while using it. Let’s look at some practical ways you can keep your ramp in top shape.
Regular Inspections
Take a close look at your ramp at least once a week. Check for loose screws, cracks, or any signs of instability. Small issues can turn into big problems if you ignore them.
Try walking your dog up and down the ramp and observe if it wobbles or shifts. This hands-on test helps you spot any hidden problems that might not be obvious at first glance.
Cleaning Tips
Keep the ramp clean to prevent dirt buildup and slippery surfaces. Use a mild soap and warm water to wipe down the ramp regularly. Avoid harsh chemicals that could damage the materials or harm your dog’s paws.
Dry the ramp thoroughly after cleaning to prevent mold and mildew. If your ramp has a carpet or fabric covering, vacuum it often to remove pet hair and debris.
Repairing Wear And Tear
Small scratches or worn spots can affect your dog’s grip and safety. Use non-toxic wood filler or patch kits for minor damages on wooden ramps. Sand down rough edges to avoid splinters.
Replace any torn fabric or loose grip tape to maintain traction. Don’t delay repairs—your dog relies on you to keep the ramp safe and secure. Have you noticed any worn parts that need fixing?

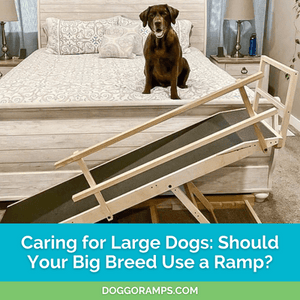
Credit: doggoramps.com
Frequently Asked Questions
How Do I Build A Sturdy Dog Ramp For A Bed?
Use strong wood like plywood and secure it with screws. Add non-slip tape on the surface for safety. Ensure the ramp angle is gentle to prevent strain on your dog’s joints.
What Materials Are Best For A Diy Dog Ramp?
Plywood, non-slip tape, and screws are ideal materials. Use durable wood for strength and grip tape for traction. Avoid slippery surfaces to keep your dog safe when climbing.
How Steep Should A Dog Ramp For Bed Be?
Keep the ramp angle between 18 to 25 degrees. A gentle slope prevents joint stress and makes climbing easy. Steeper ramps can cause discomfort and increase injury risk.
Can Small Dogs Use The Same Ramp As Large Dogs?
Ramps can be adjusted in width and height for size. Small dogs need narrower ramps with lower slopes. Large dogs require wider, sturdier ramps for stability.
Conclusion
Building a dog ramp for bed is simple and rewarding. Your pet gains safe access to the bed. This DIY project suits any budget. The materials are easy to find. Follow the steps closely for best results. Ensure the ramp is sturdy and secure.
This enhances safety and comfort for your dog. Customizing the ramp adds a personal touch. It reflects your love and care. Enjoy creating a solution that benefits you both. A happy dog equals a happy home.