
Do you want to learn how to draw a hummingbird that looks both delicate and full of life? You’re in the right place.
This step-by-step guide breaks down the process into simple, easy-to-follow steps. Whether you’re a beginner or just looking to improve your skills, you’ll find tips that make drawing this beautiful bird fun and rewarding. By the end, you’ll have a hummingbird you’re proud to show off.
Ready to bring your art to life? Let’s get started!

Credit: www.youtube.com
Materials Needed
Before you start drawing your hummingbird, gathering the right materials can make a huge difference. Having everything at hand keeps your creative flow smooth and your focus sharp. It also helps you avoid those frustrating moments when you realize you’re missing a key tool.
Essential Drawing Tools
- Pencils:A range of pencils from HB to 4B gives you control over light and dark shading. I always keep a sharp HB pencil for fine details, which really brings the hummingbird to life.
- Eraser:A kneaded eraser is perfect for gently lifting graphite without damaging the paper. It’s great for fixing small mistakes and adding highlights.
- Paper:Choose smooth drawing paper that can handle erasing and shading without tearing. I prefer a medium-weight paper; it balances texture and durability well.
- Sharpener:A reliable sharpener keeps your pencils ready for precise lines. Nothing kills momentum like a dull tip.
Optional Coloring Supplies
Once your hummingbird sketch is complete, adding color can enhance the vibrancy and depth of your drawing. You don’t have to use these, but they add a whole new dimension.
- Colored Pencils:Choose a set with a wide range of greens, blues, and reds to capture the hummingbird’s iridescent feathers.
- Watercolor Paints:If you want a softer, more fluid look, watercolors work beautifully. Just remember to use watercolor paper if you plan to paint over your sketch.
- Fine Liners or Ink Pens:These are perfect if you want to outline your drawing for a cleaner finish. They help the details pop.
Think about which materials suit your style and the effect you want. What tools do you feel most comfortable with? Your choice can shape the entire drawing experience.
Basic Shapes And Proportions
Starting with basic shapes and proportions is key to drawing a hummingbird. This approach helps create a balanced and accurate figure. Simple shapes form the foundation of the hummingbird’s body and guide the placement of details later.
Using circles, ovals, and lines makes the sketch easier. These shapes break down the complex form into manageable parts. Keeping proportions correct ensures the hummingbird looks natural and lively.
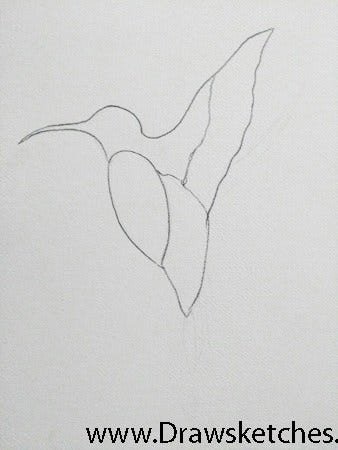
Sketching The Body Outline
Begin with a small oval for the hummingbird’s body. This oval represents the chest and belly area. Draw it slightly tilted to show the bird’s posture.
Add a larger oval overlapping the small one. This will be the bird’s back and wing base. Keep the shapes light and loose for easy changes.
Use a curved line to connect the two ovals. This creates a smooth body shape. Avoid hard edges to keep the form fluid.
Marking Head And Tail Positions
Draw a small circle above the body for the head. Position it slightly forward to capture the bird’s alert look.
Add a tiny oval or triangle for the beak. Point it outward and slightly upward to mimic the natural angle.
Sketch a long, thin triangle at the rear end for the tail. The tail should extend naturally from the body shape.
Use simple lines to connect these parts. This helps maintain the correct proportions and placement.
Drawing The Wings
Drawing the wings of a hummingbird brings the sketch to life. Wings show movement and grace. Capturing their shape is key to realism. Focus on their unique form and flow.
Creating Wing Structure
Start by sketching the wing’s basic shape. Use light, curved lines to outline the wings. Draw two main sections: the upper and lower wing. The upper wing is longer and slender. The lower wing is shorter and wider. Connect these sections smoothly. Add simple lines to show wing bones. These act as a frame for feathers. Keep the lines soft to adjust later. This structure helps keep the wings balanced and natural.
Adding Feather Details
Feathers give wings texture and depth. Begin by drawing long feathers along the wing edges. Use short, curved strokes for smaller feathers inside. Layer feathers from big to small. Overlap them slightly for realism. Vary feather size to add interest. Shade lightly near the base of feathers. This creates a soft shadow effect. Avoid too many lines; keep it simple. Details make wings look delicate and lively.

Credit: www.youtube.com
Shaping The Head And Beak
Shaping the head and beak of a hummingbird is a crucial part of capturing its delicate and lively character. This area draws the viewer’s eye first, so getting the proportions right helps your drawing feel natural and vibrant. Let’s break down the process into manageable parts to make your hummingbird come alive on paper.
Forming The Head
Start with a simple oval or circle to outline the head’s basic shape. Keep it small and slightly angled to reflect the hummingbird’s alert posture.
Don’t worry about perfection here; this is your foundation. Light, smooth lines will help you adjust the shape as you go.
Imagine how a tiny ball balances on a slender neck — that’s the feeling you want to capture with your head shape.
Drawing The Beak And Eye
The beak is long, thin, and pointed — almost like a needle. Begin by sketching a straight line extending from the head’s front, then add a slight taper to the tip.
Place the eye just above the beak line, closer to the head’s front. It should be small and round, but sharp enough to express alertness.
- Use a dark dot for the pupil to make the eye stand out.
- Leave a tiny white spot inside the eye to mimic a reflection — this adds life.
Have you noticed how a small change in beak length can make your hummingbird look either curious or cautious? Experiment with this until you find the expression you want.
Detailing The Body
Detailing the body of your hummingbird drawing brings the sketch to life. This stage focuses on capturing the delicate nature of feathers and the subtle textures that make the bird unique. Paying close attention here can transform a simple outline into a captivating piece.
Defining Feathers
Start by sketching the feather shapes with light strokes. Notice how hummingbird feathers overlap like tiny shingles on a roof, especially around the wings and tail.
Use short, curved lines to represent individual feathers without overdoing it. You don’t need to draw every feather; suggest texture by grouping them in clusters.
Try varying the size and direction of the feathers to reflect movement and natural flow. Ask yourself: which feathers catch the light, and which ones are hidden underneath?
Adding Texture And Depth
Texture comes from shading and layering. Use gentle shading to create shadows between feathers, giving your drawing a three-dimensional feel.
Blend softly to keep the hummingbird’s soft and iridescent look, but add sharper lines in areas needing more definition, like the wing edges.
Remember, depth is about contrast. Darken the areas under the wings and near the body’s curve to make the hummingbird pop from the page.

Credit: www.youtube.com
Inking And Refining Lines
Inking and refining lines brings your hummingbird drawing to life. It adds clarity and sharpness to the soft pencil sketch. This stage enhances the details and gives the artwork a polished look.
Use a fine-tipped pen or marker for inking. Work slowly to keep your lines clean and smooth. Focus on the main shapes and important features. Avoid rushing, as mistakes are harder to fix after inking.
Outlining Key Features
Trace the hummingbird’s body, wings, and beak carefully. Emphasize curves and delicate parts like feathers and eyes. Use varied line thickness to show depth and texture.
- Thicker lines for the bird’s outline
- Thinner lines for feather details
- Light strokes for subtle areas
Keep your hand steady to avoid shaky lines. Let the pen dry before touching the paper to prevent smudges.
Erasing Pencil Marks
Wait until the ink is fully dry. Use a soft eraser to gently remove pencil lines. Take care not to rub too hard to avoid tearing the paper.
Removing pencil marks cleans the drawing and highlights the inked lines. This step makes your hummingbird drawing look neat and professional.
Coloring Techniques
Coloring brings your hummingbird drawing to life. It adds depth and beauty. Using the right techniques makes your artwork stand out. Focus on choosing the right colors and blending them smoothly. Shading helps create a realistic look. This section guides you through effective coloring techniques for your hummingbird.
Choosing Color Palette
Pick colors that match a hummingbird’s natural beauty. Bright greens, blues, and iridescent purples work well. Use a mix of light and dark shades. This helps create contrast and interest. Limit your palette to a few colors to keep it balanced.
- Start with a base color for the body.
- Use brighter colors for feathers.
- Add subtle hues for highlights.
- Include darker tones for shadows.
Choose colors that complement each other. This makes your drawing pleasing to the eye.
Blending And Shading Tips
Blend colors smoothly to avoid harsh lines. Use small, circular strokes for a soft effect. Layer colors gradually to build richness.
- Start with light pressure to apply colors.
- Layer darker shades gently over lighter ones.
- Use a blending tool or a clean brush to smooth transitions.
- Highlight edges where light hits the feathers.
- Shade areas under wings and tail for depth.
Shading creates a three-dimensional feel. Blending enhances realism. Practice these steps to improve your coloring skills.
Final Touches
Final touches bring your hummingbird drawing to life. These small details create depth and interest. They make your artwork look polished and complete. Focus on light and background to enhance the overall image.
Highlighting Light Reflections
Light reflections give your hummingbird a shiny and vibrant look. Use a white pencil or gel pen to add tiny spots on the eyes and feathers. Place highlights where the light naturally hits the bird. This adds realism and makes the drawing pop.
Keep highlights subtle. Too many bright spots can distract from the main details. Study reference photos to understand where light falls on a hummingbird’s body. Add soft glows on the beak and wing edges for a natural effect.
Adding Background Elements
Background elements set the scene and add context to your hummingbird. Draw simple shapes like flowers, leaves, or branches around the bird. Use soft colors or light shading to keep the focus on the hummingbird.
A blurred background mimics depth of field in photography. This technique makes the bird stand out more. Use gentle strokes or light washes of color for a smooth background effect. Avoid overcrowding the space with too many details.
Frequently Asked Questions
How Do I Start Drawing A Hummingbird?
Begin by sketching basic shapes like circles and ovals to outline the hummingbird’s body and head. This helps create a balanced foundation. Then, add guidelines for wings and tail placement to maintain correct proportions.
What Materials Are Best For Drawing Hummingbirds?
Use pencils for sketching and fine-tip pens for details. Watercolors or colored pencils work well for vibrant feather colors. Choose smooth paper to enhance line quality and color blending.
How Can I Make Hummingbird Wings Look Realistic?
Draw wings with layered feathers using curved, overlapping lines. Vary feather sizes to show depth. Add light shading for a three-dimensional effect and highlight motion.
What Are Common Mistakes When Drawing Hummingbirds?
Avoid incorrect proportions, such as oversized wings or tiny bodies. Don’t neglect feather details or wing structure. Rushing can cause uneven lines; take time for precision.
Conclusion
Drawing a hummingbird can be a fun journey. You've learned the basics here. Start with simple shapes. Gradually add details like feathers and wings. Remember, practice makes perfect. Don't rush. Enjoy each stroke of your pencil. Experiment with colors to bring your bird to life.
Share your artwork with friends or family. They might offer helpful feedback. Keep drawing, and soon you'll see improvement. Art is about expression, not perfection. Keep your passion alive. With time, your skills will grow. Happy drawing!